
How to Install New Fonts
You’ve bought and downloaded a brand new font to your computer. Now what? Learn how to install new fonts to your computer with a few incredibly easy steps.
I’m a little bit of a font addict. Before I bought my new iMac back in April, I had a Windows laptop that was so incredibly slow. When I went to transfer my important files over, I realized it was because I had about a trillion fonts installed on my laptop. OK, so that’s a bit of an exaggeration (and not the reason it was slow!) but you get my point. I love fonts! Give me all the fonts!
If you’ve never installed a new font before, then you are in luck because I have installed SO MANY and on both a Mac and PC. The steps are slightly different although not by much, for each operating system. For a look at where I purchase the majority of my fonts, check out this post on the best resources for fonts and graphics. Also, you may want to brush up on the different font styles before you start going crazy with new fonts!

Before we start, let me explain one little detail to you. There are two types of font files; .ttf and .otf. The .ttf extension stands for true type format and the .otf is for open type format. Generally speaking, .otf format has more bells and whistles when it comes to extra glyphs, characters, and overall design. The extras within this format are usable within the Adobe Creative Cloud Suite. If you just plan to use your downloaded fonts in a word processor or basic design program then stick with .ttf. It’s also important to note that you can only have one type of font file installed per font.
How to Install New Fonts on Mac
First, locate the font zip folder you just downloaded (Brazilian Script). This will generally default to your Downloads folder under your home drive.
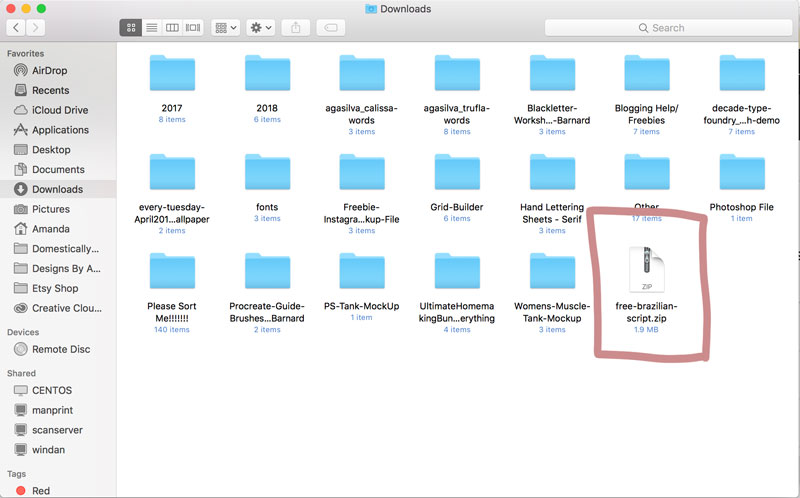
Double click on it to unzip the file. Now you will have a folder and a zip folder with the same name. You can get rid of the zip folder or save it as a backup.

Double click on the folder and locate the font files. These will end in either .ttf or .otf. See above to learn more about the different types.

Open the font file and a dialog box will pop up. In the bottom right corner select Install Font.

This will bring up Font Book (an Apple program) and will display your newly installed font. It will also show you the rest of your fonts too. Font Book looks like a pretty cool app that I haven’t had the time to really dive into.

Note: if you are trying to install a duplicate font or two different versions of the same font, you may get a screen that lists errors within that font file. If it’s just a duplicate name, you can still check the box and click install font. Otherwise, you may have a corrupt font file (if you got it from a sketchy site).
How to Install New Fonts on Windows
These are mostly the same as Mac, however, PC’s do not have a Font Book like application (that I’m aware of anyway) and unzipping folders isn’t exactly necessary. You can unzip the folder, but you can still access and install the font files without it.
First, find the zip folder you just downloaded that includes the new font. Generally, this will default to your downloads folder unless you specified a new location before downloading, like your desktop.
Double click to open the new folder and locate the font files. Like I mentioned above, these will end in .ttf or .otf.

Open the file and a new box will pop up displaying what the font looks like “The quick brown fox jumps over the lazy dog” style. Click the Install Font button on the top left corner.

That’s it! You’re done.
See how easy it is to install new fonts onto your computer?
You may also like:
- Simple Guide to Pairing Fonts
- Favorite Google Font Pairings
- The Best Resource for Fonts and Graphics
- How to Preview All Fonts on Your Computer
Love it? Pin it!


Great step by step tutorial on installing fonts. I’ve only downloaded a few and had to learn by trial and error on installing. Wish I had this sooner 🙂